

Table of Contents
Introduction:
Build Your First AI Chatbot : today with this easy-to-follow step-by-step tutorial designed for beginners. Whether you’re a developer or simply curious about artificial intelligence, this guide walks you through essential tools, coding basics, and deployment tips to create a smart, interactive chatbot from scratch. Get ready to bring your AI project to life!
Choosing the Right Platform and Tools
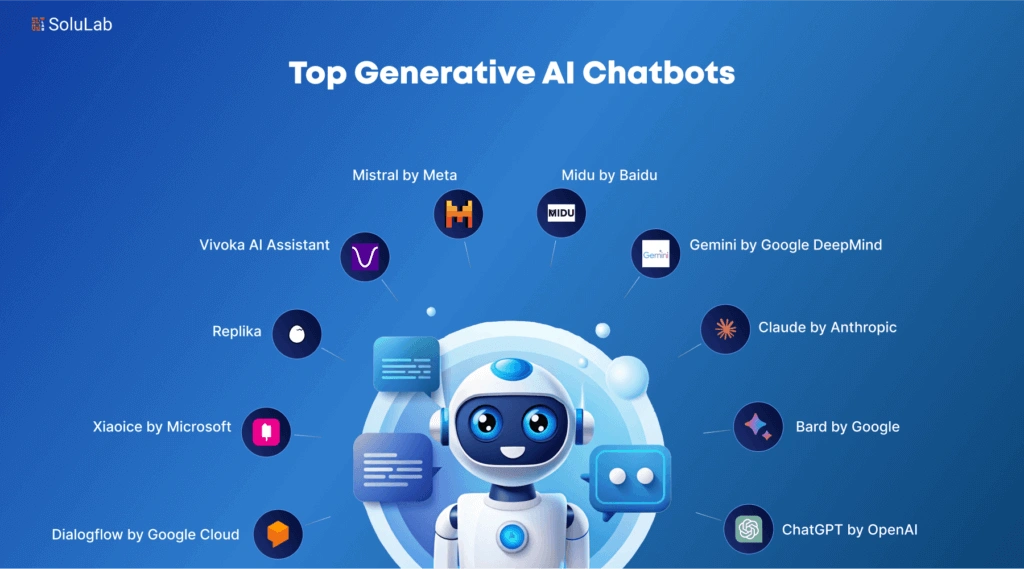
When you begin the journey to build your first AI chatbot, one of the most critical steps is selecting the right platform and tools that align with your goals, technical skills, and use case. Today’s ecosystem offers a variety of robust chatbot development platforms that make the process faster and more accessible—even for beginners. Google Dialogflow is a popular choice thanks to its integration with Google Cloud and powerful natural language understanding (NLU) capabilities. It’s ideal for voice assistants and customer support bots. On the other hand, Microsoft Bot Framework provides an enterprise-grade solution with seamless support for Azure, making it suitable for developers who need to build scalable, multi-channel bots. If you’re looking for more control and flexibility, Rasa—an open-source framework—stands out. It’s favored by developers who want to create highly customized bots and prefer data privacy, as everything is hosted on your own server.
Next, consider the programming language you’re most comfortable with. Python is widely supported and offers rich AI libraries like TensorFlow, spaCy, and NLTK, making it a great choice for those looking to dive deeper into machine learning. JavaScript, especially with Node.js, is another excellent option if you’re building for the web and want asynchronous, event-driven performance. Many chatbot platforms support both languages, so you can choose based on your background and long-term project needs.
Finally, integrating advanced AI APIs will take your chatbot from simple keyword-based responses to intelligent, human-like interactions. OpenAI’s GPT (like GPT-4) enables your bot to generate natural, context-aware replies, making conversations more fluid and realistic. For those looking for a lightweight option with solid intent recognition and entity extraction, Wit.ai (by Meta) offers a free and developer-friendly interface that can be quickly integrated into any chatbot stack. Choosing the right combination of platforms, languages, and AI models is the foundation for building a chatbot that’s not just functional—but truly conversational and scalable.
Designing the Conversation Flow
After selecting your tools and platform, the next crucial step in the process to build your first AI chatbot is designing a clear, user-friendly conversation flow. This is where your chatbot’s usability and user satisfaction are shaped. Start by mapping out user intents—the goals or actions your users want to accomplish when they interact with your bot. For instance, in a customer support chatbot, common intents might include “track my order,” “reset password,” or “speak with an agent.” Alongside each intent, define potential user queries and phrases that could trigger them. This ensures your bot understands diverse ways people might ask the same question, accounting for natural variations in language.
Next, focus on building your chatbot’s personality and tone, which play a huge role in how users emotionally connect with your bot. Is your chatbot professional and concise, or playful and friendly? Align its tone with your brand or target audience. A travel chatbot might be cheerful and enthusiastic, while a legal support bot should be more formal and neutral. Consistency in voice makes conversations feel more human and builds trust with users.
To improve both development and user experience, use flowcharts and dialogue trees to visualize the structure of conversations. These tools help you plan logical paths users might take and identify dead ends or overly complex branches. Tools like Miro, Lucidchart, or even pen-and-paper can help you sketch out interactions, including greetings, follow-up questions, responses, and fallback messages. Visualizing these paths makes it easier to test and improve your chatbot before going live and ensures your users are guided naturally through the conversation without confusion or frustration.
Writing the Core Code and Training the Model
Once your conversation flow is designed, it’s time to move into the hands-on part of the journey to build your first AI chatbot—writing the core code and training the model. The first step is setting up your development environment, which involves installing the necessary tools and frameworks based on your chosen language and platform. For Python users, this typically means installing packages like Flask or FastAPI for handling requests, and AI libraries such as Transformers, spaCy, or TensorFlow for natural language processing. JavaScript developers using Node.js may opt for frameworks like Botpress, Microsoft Bot Framework SDK, or Express combined with NLP APIs. Setting up version control with Git and creating a virtual environment helps keep your project organized and portable.
With your environment ready, the next step is to create the basic code structure that allows your chatbot to receive, process, and respond to messages. This usually involves setting up routes (for web-based bots), handling input, sending that input through a language model or intent classifier, and returning a response. If you’re integrating an external AI service like OpenAI, this is also where you’d make API calls to retrieve context-aware replies. Code modularity is key here—keeping functions separate for parsing input, classifying intent, managing sessions, and sending responses ensures scalability and easy maintenance.
The final piece of this phase is training your chatbot using sample datasets. Depending on your approach, this could involve feeding structured conversation examples into platforms like Dialogflow or Rasa to help them learn common queries and responses. If you’re building a custom model, you may need to label data manually—defining which phrases correspond to which intents and entities. The more diverse and relevant your training data, the smarter and more responsive your chatbot becomes. Don’t forget to include edge cases and less common user inputs to improve reliability. Training is an iterative process—start small, test often, and refine your dataset as you gather more real-world interactions.
Testing and Improving Chatbot Responses
After building the initial version, the next key step to build your first AI chatbot is thoroughly testing and continuously improving its responses. This phase ensures your chatbot not only functions correctly but also delivers a smooth and satisfying user experience. Begin by applying techniques for debugging conversations, which means going through dialogue logs, simulating interactions, and identifying where the bot fails to understand user intent or gives irrelevant responses. Many platforms, like Dialogflow and Rasa, include built-in test consoles that allow you to enter user inputs and inspect how the bot processes them step-by-step. Look for mismatches between predicted and actual intents, missing responses, or confusing dialogue branches.
Once basic debugging is done, the next critical step is collecting feedback from real user interactions. Deploy your chatbot in a controlled environment—perhaps a beta version for a small group of users—and monitor how they interact with it. Tools like Botanalytics or custom logging scripts can help track conversation flows, detect common queries the bot isn’t handling well, and even gather user satisfaction scores. Encourage users to report confusing moments directly within the chat. This kind of real-world feedback is invaluable for training and improving your chatbot’s intelligence and flow.
Lastly, to make your bot resilient and user-friendly, implement fallback responses and robust error handling. Fallbacks act as a safety net when the chatbot doesn’t understand the user’s request. Instead of staying silent or giving a vague reply, the bot can say something like, “I didn’t quite get that—can you rephrase it?” or suggest clickable options. This keeps the conversation going without frustrating the user. Error handling should also address technical issues like timeouts, API failures, or missing data gracefully. A well-tested chatbot that improves through feedback and handles the unexpected will offer a much better user experience—and will set your project apart as polished and professional.
Deploying Your Chatbot and Monitoring Performance
The final step to build your first AI chatbot is deployment and ongoing performance monitoring. Once your chatbot is tested and refined, you need to make it accessible to real users. This begins with choosing the right hosting option, which depends on your technical needs and budget. If you’re working with Python or Node.js, platforms like Heroku, Vercel, or Render offer simple deployment pipelines for small to medium-sized bots. For more control and scalability, cloud platforms such as AWS, Google Cloud Platform (GCP), or Microsoft Azure allow you to host your chatbot using virtual machines or serverless functions like AWS Lambda, which scale automatically and only charge for actual usage—perfect for chatbots with variable traffic.
Once hosted, your chatbot needs to be available where users already are. That means connecting it to popular messaging channels like Facebook Messenger, WhatsApp, Telegram, or your own website via live chat widgets. Each platform has its own integration process and API access, but most modern chatbot frameworks (like Dialogflow and Microsoft Bot Framework) offer direct connectors or SDKs to simplify the integration. Adding multichannel support expands your bot’s reach and ensures users can interact with it wherever they’re most comfortable.
Deployment doesn’t stop at going live—you also need to monitor performance and plan for growth. Use analytics tools to track KPIs such as user retention, intent recognition accuracy, average session duration, and common drop-off points. This data helps you optimize conversation flows and fix weak areas. Many chatbot platforms provide built-in analytics dashboards, or you can integrate third-party solutions like Google Analytics, Dashbot, or Botanalytics. As your user base grows, consider scaling your infrastructure, implementing load balancers, and optimizing database queries to maintain speed and reliability. Regular updates and performance checks ensure your chatbot stays sharp, responsive, and ready to handle increasing demand.
Conclusion
Learning how to build your first AI chatbot might seem daunting at first, but with the right tools, clear structure, and a step-by-step approach, it becomes an achievable and rewarding project—even for beginners. From selecting the right platform and mapping user interactions to writing clean code and deploying your chatbot into real-world channels, each phase plays a vital role in shaping a chatbot that is not only functional but also engaging and helpful to users.
The key to long-term success lies in iteration: testing your chatbot, gathering feedback, and refining its performance based on real user behavior. The more you understand your audience and adapt your bot accordingly, the more intelligent, human-like, and effective it will become. As AI technology evolves, new tools and possibilities will continue to emerge—so staying curious and keeping your skills up to date will keep you ahead of the curve.
Whether you’re building a chatbot for fun, customer service, education, or e-commerce, you now have a clear roadmap to bring your idea to life. So don’t wait—start experimenting, coding, and training today. The chatbot revolution is here, and your first AI assistant is just a few steps away from becoming reality.